The basic idea of the method is to solve the entire cube from here by just turning the 2 free sides. But if you try to do that, you soon discover that some edges are always twisted the wrong way. We call those the "bad" edges. We need to fix that before we move on. Step 3 is this fix.
Step 3 can seem incomprehensible before you "get" it, but it is really the simplest step in the method.
Basically, we need to do 2 things in step 3.
1. Identify the bad edges.
There are 7 edges not part of the 2x2x3. Pick any one
of them, say the red/blue one. Using only the 2 free
layers (that is, not breaking up the 2x2x3), place it
between the red and blue center pieces.
If it's twisted right, it's good. Otherwise it's bad. That's all.
Make a (mental or on paper) note of it, and check the next edge. When checking the second
and later edges, do not try to keep the previous edges in place.
It is not only extremely difficult, but also completely unnecessary.
Once you know if an edge is good or bad, you know.
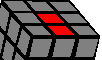
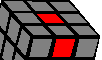
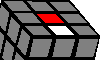
2. Turn bad edges into good edges.
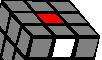
There are always an even number of bad edges. You can
make them good in pairs. The simplest way is the 3 move sequence shown to
the right. Just place two bad edges in the positions of the colored edges,
and do it. Check that your edges actually became good the
first times, to be sure you're doing it right.
Continue until you're sure all edges are good.
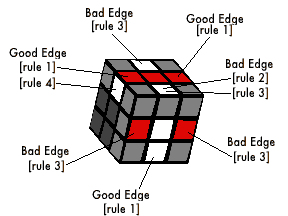
It is easy to see which edges are bad without moving them.
Let's call the colors of the two remaining centers A and B
(red and white in the illustrations).
Ignore everything except the stickers on the (unsolved) edges with color A or B.
There are the four simple rules to remember:
The usual advice applies in step 3 as well: Look ahead, and try to make a good beginning for the next step.
I find that way of thinking much easier than just learning all cases by heart. However you want to learn them, every possible case is given the fastest solution in the links below.
2 bad edges | 4 bad edges | 6 bad edges
